Share
Pin
Tweet
Send
Share
Send
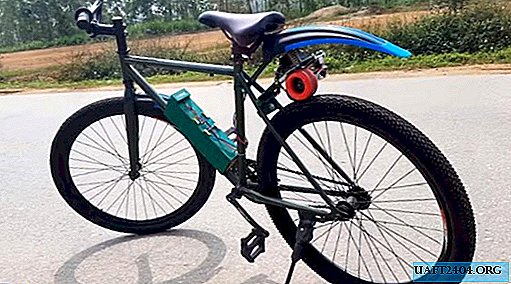
Such models are widely discussed on the net. The debate around them does not subside, because alterations sometimes cost more than cars. But the author of the video did not strive for glamor or a stunning design. Quite the contrary, his electric bike model can be called budget. All parts can be purchased at Chinese sites or in domestic online stores. The bike itself is not overloaded, and thanks to the alteration, it looks quite modern. You can make it in a regular home workshop. Whether it is worth it and whether it is necessary to bother, once again inventing a "bicycle", let's find out together.
Materials:
- Regular bike;
- 320kV brushless motor. You can of course take such a DC motor and control it with the help of a PWM controller;
- Battery lead GP1272 F2 - 2 pcs;
- Belt drive for gears;
- Pendant for a skate with a wheel;
- Mounting plate for the engine on the suspension;
- Speed controller FVT 180 A;
- Radio-controlled transmitter with receiver for electric motors;
- Metal plate (preferably stainless steel or aluminum);
- Car spray paint;
- Bolts, screws, nuts, washers;
- Wiring with terminals for connecting contact groups;
- Insulation tape;
- Tight anodized tensile spring;
- Powerful loop with small shelves;
- Metal plates for clamps and gaskets;
- A section of a profile pipe 15x15 mm, length - about 50 cm;
- Double adhesive tape.
Instruments:
- Drill or screwdriver;
- Bulgarian (angle grinder);
- Welding inverter;
- Drills, discs for grinder cutting and grinding;
- Set of open-end and hex wrenches;
- Stripper for crimping terminals on wires;
- Screwdriver, pliers, paint knife and tape measure with a pencil.


We assemble an electric bike
The author took a ready-made kit for converting a skateboard into an electric board as the basis of the driving mechanism of his electric bike. It can be bought at Chinese sites complete with an engine and belt drive within $ 100. The engine for them provides a 24-volt, which works without brushes. For such devices, this is the most profitable design, the weight is about 500 grams, and the power is 1800 watts! Of course, with these characteristics of traction, he has enough to easily pull the bike along with the rider.
Step one - make an electric drive on the suspension
First of all, we attach the mounting platform for the engine and the belt drive to the suspension axis. Next, we fix the wheel from the skateboard with gear on the axis of the suspension.


Now you need to correctly set the mounting platform for the engine. We unfold it perpendicular to the vertical axis of the suspension, and press the clamping bolt with a hex key.


We install the engine on the seat, tighten it with four screws and put on a small gear for belt transmission.


Step two - connect the electrical circuit
The suspension assembly is ready, now it can be connected through the speed controller to the batteries. We connect them in series. The author of the video added a rheostat switch to the circuit in order to be able to smoothly change the voltage and track the operation of the engine in this case.


We disconnect the rheostat (we don’t need it anymore), and connect the radio-controlled controller-handle with the receiver-transmitter. This equipment is used by skateboarders to control electric boards. A convenient trigger on the handle allows you to control such a device easily and naturally.


Third step - we fix the driving module on the bicycle frame
Installing such a module has its own characteristics. If it is fixed on the bicycle frame tightly, the wheel from the skate can wipe the bicycle tire, and the engine can overheat from excessive pressure and burn out. In the free position, such a suspension will hang like unnecessary ballast during a ride, especially on country roads. Functional fasteners require a fulcrum and a linkage that will push the skateboard wheel to the tire. We will do it now.
Raise the rear wing of the bike higher to place a moving module in its place.


The suspension must be slightly trimmed by removing the unclaimed second axis from it. We clamp the device in a vice, and with a grinder (angle grinder) we cut it flush with the mounting platform for the board. We clean the cut edges with a grinding disc.


From the sheet of metal we cut out the protective cover for the moving module. We mark it by the size of the device, and cut it with a grinder. To fix the engine, we make holes for the mounting plate, and we sit it on the bolts.


The movable module will be attached to the frame through a small but powerful hinge. She will be the axis of our device. On the back of the protective cover we fix the loop with a welding inverter. We clean the seams with a grinder.


Using a piece of a regular door hinge, we make a clamp for fastening to the frame. The protective cover with a loop is spray painted in the color of the bicycle frame. Fasten it to the bolts to the device of the movable module.


We mount the entire device using a powerful bolt. We drill a hole in the loop and frame, we press the bolt connection through it with open-end and ring spanners. It is necessary to adjust its position so that the skateboard wheel is set parallel to the wheel ramp and moves with it in the same plane.


Fourth step - prepare the lever
The clamping mechanism is made in the form of a small lever. It relies on a stiff spring defined for compression.
We fix the bolt on the cover, which will restrain the movement of the spring, and will not let it slip.


We make a lever from a profile pipe 15x15 mm. We mark an angular slice at one end of it, and a 90 degree bend at the other. We make cutouts with a grinder, and weld the connection with a welder.


From an aluminum plate we make a crimp clamp to secure the lever to the frame. Having cleaned the seams, you can start painting.


Step Five - Install an Electrician on a Bicycle
We place battery banks on the diagonal cross member of the frame. We rest them in a vertical rack and wrap them tightly with tape, leaving only the terminals of the contacts open. We install the lever on the frame, fix the clamp on the bolt connection, and press it with a screwdriver. We put the spring on the seat, and check the force of the clamp to the tire.


Under the saddle we fasten the plastic wing through the crimp bracket. Glue the speed regulator with double tape on the protective cover. We connect the contacts of the motor and the regulator. Solder wires insulate heat shrink. We glue the receiver with the transmitter for radio-controlled control nearby.


We cut the wiring to connect the batteries and the movable module. Using a stripper, you can crimp the terminals and strip the insulation. We wrap a long wiring around the frame, and solder the terminal block to connect to the speed controller. We tie a loop of wires with nylon ties. The device is ready to run!


Having lifted the driving rear wheel on a bicycle support, you can try to get our electric bike. The advantage of an electronic speed controller is that it allows you to accurately reproduce a given voltage up to a complete shutdown. They are often used for electric boards and model cars.


An electronic sensor mounted on the front side of the cans will help in time to control battery charging. For charging, we use a professional device for lithium-ion and polymer batteries with a voltage stabilizer.


It's time to take the electric bike and ride somewhere, having tried the duration of the batteries. Despite the lack of a rear brake, turning off the engine power should help to smoothly stop the electric bike.


Well and the most important of the advantages of this type of transport - if you suddenly have batteries running out, you can always pedal to the nearest source of electricity, and continue your fascinating journey light!
Share
Pin
Tweet
Send
Share
Send

